Wedding photography is an art form that requires a seamless blend of technical expertise and creative vision. Photographers not only capture cherished moments but also seek to tell a story, weaving emotion and atmosphere into every shot. Achieving this often means going beyond standard techniques, and one subtle yet powerful tool that can elevate wedding photography to the next level is the use of color gels.
Color gels, or lighting gels, are thin sheets of colored material placed over light sources to manipulate the color of the light they emit. While they may seem like a simple accessory, the possibilities they offer are anything but ordinary. These gels allow photographers to introduce a creative flair, enhance the mood, or add a distinct artistic depth to their photographs. By experimenting with different colors and intensities, photographers can transform an ordinary shot into something extraordinary.
Color gel photography also allows photographers to handle challenging lighting scenarios creatively. Instead of merely correcting unfavorable light conditions, gels can be used to complement or counteract existing light sources, crafting balanced or intentionally dramatic portraits. Moreover, gels open the door to more dynamic compositional storytelling. By layering colors or using them in conjunction with other light modifiers, photographers can create vivid contrasts, and gradients, or even simulate artistic effects that are nearly impossible to achieve during post-processing.
What Are Color Gels?
Color gels are sheets of semi-transparent colored material, usually made from polyester or polycarbonate, designed to modify the color of lighting. Historically used in theater and stage lighting, color gel portraits have evolved into an essential tool for photographers and cinematographers alike.
Gels generally fall into two categories:
- Color correction gels adjust the light’s temperature, helping balance different light sources (e.g., tungsten versus daylight).
For wedding photographers, creative gels are the key to crafting visually compelling shots that convey mood, highlight emotions, and deliver a dramatic, polished aesthetic.
Using Color Gels in Wedding Photography
Wedding photography typically involves shifting environments—from the serene ambiance of a ceremony to the energetic buzz of the reception. Color gels provide a versatile solution in such fluctuating conditions. They allow you to balance or manipulate lighting, whether you are working with natural sunny day photography, dim indoor settings, or artificial lights.
Here’s how color gels can enhance your wedding photography:
1. Creating Mood and Atmosphere
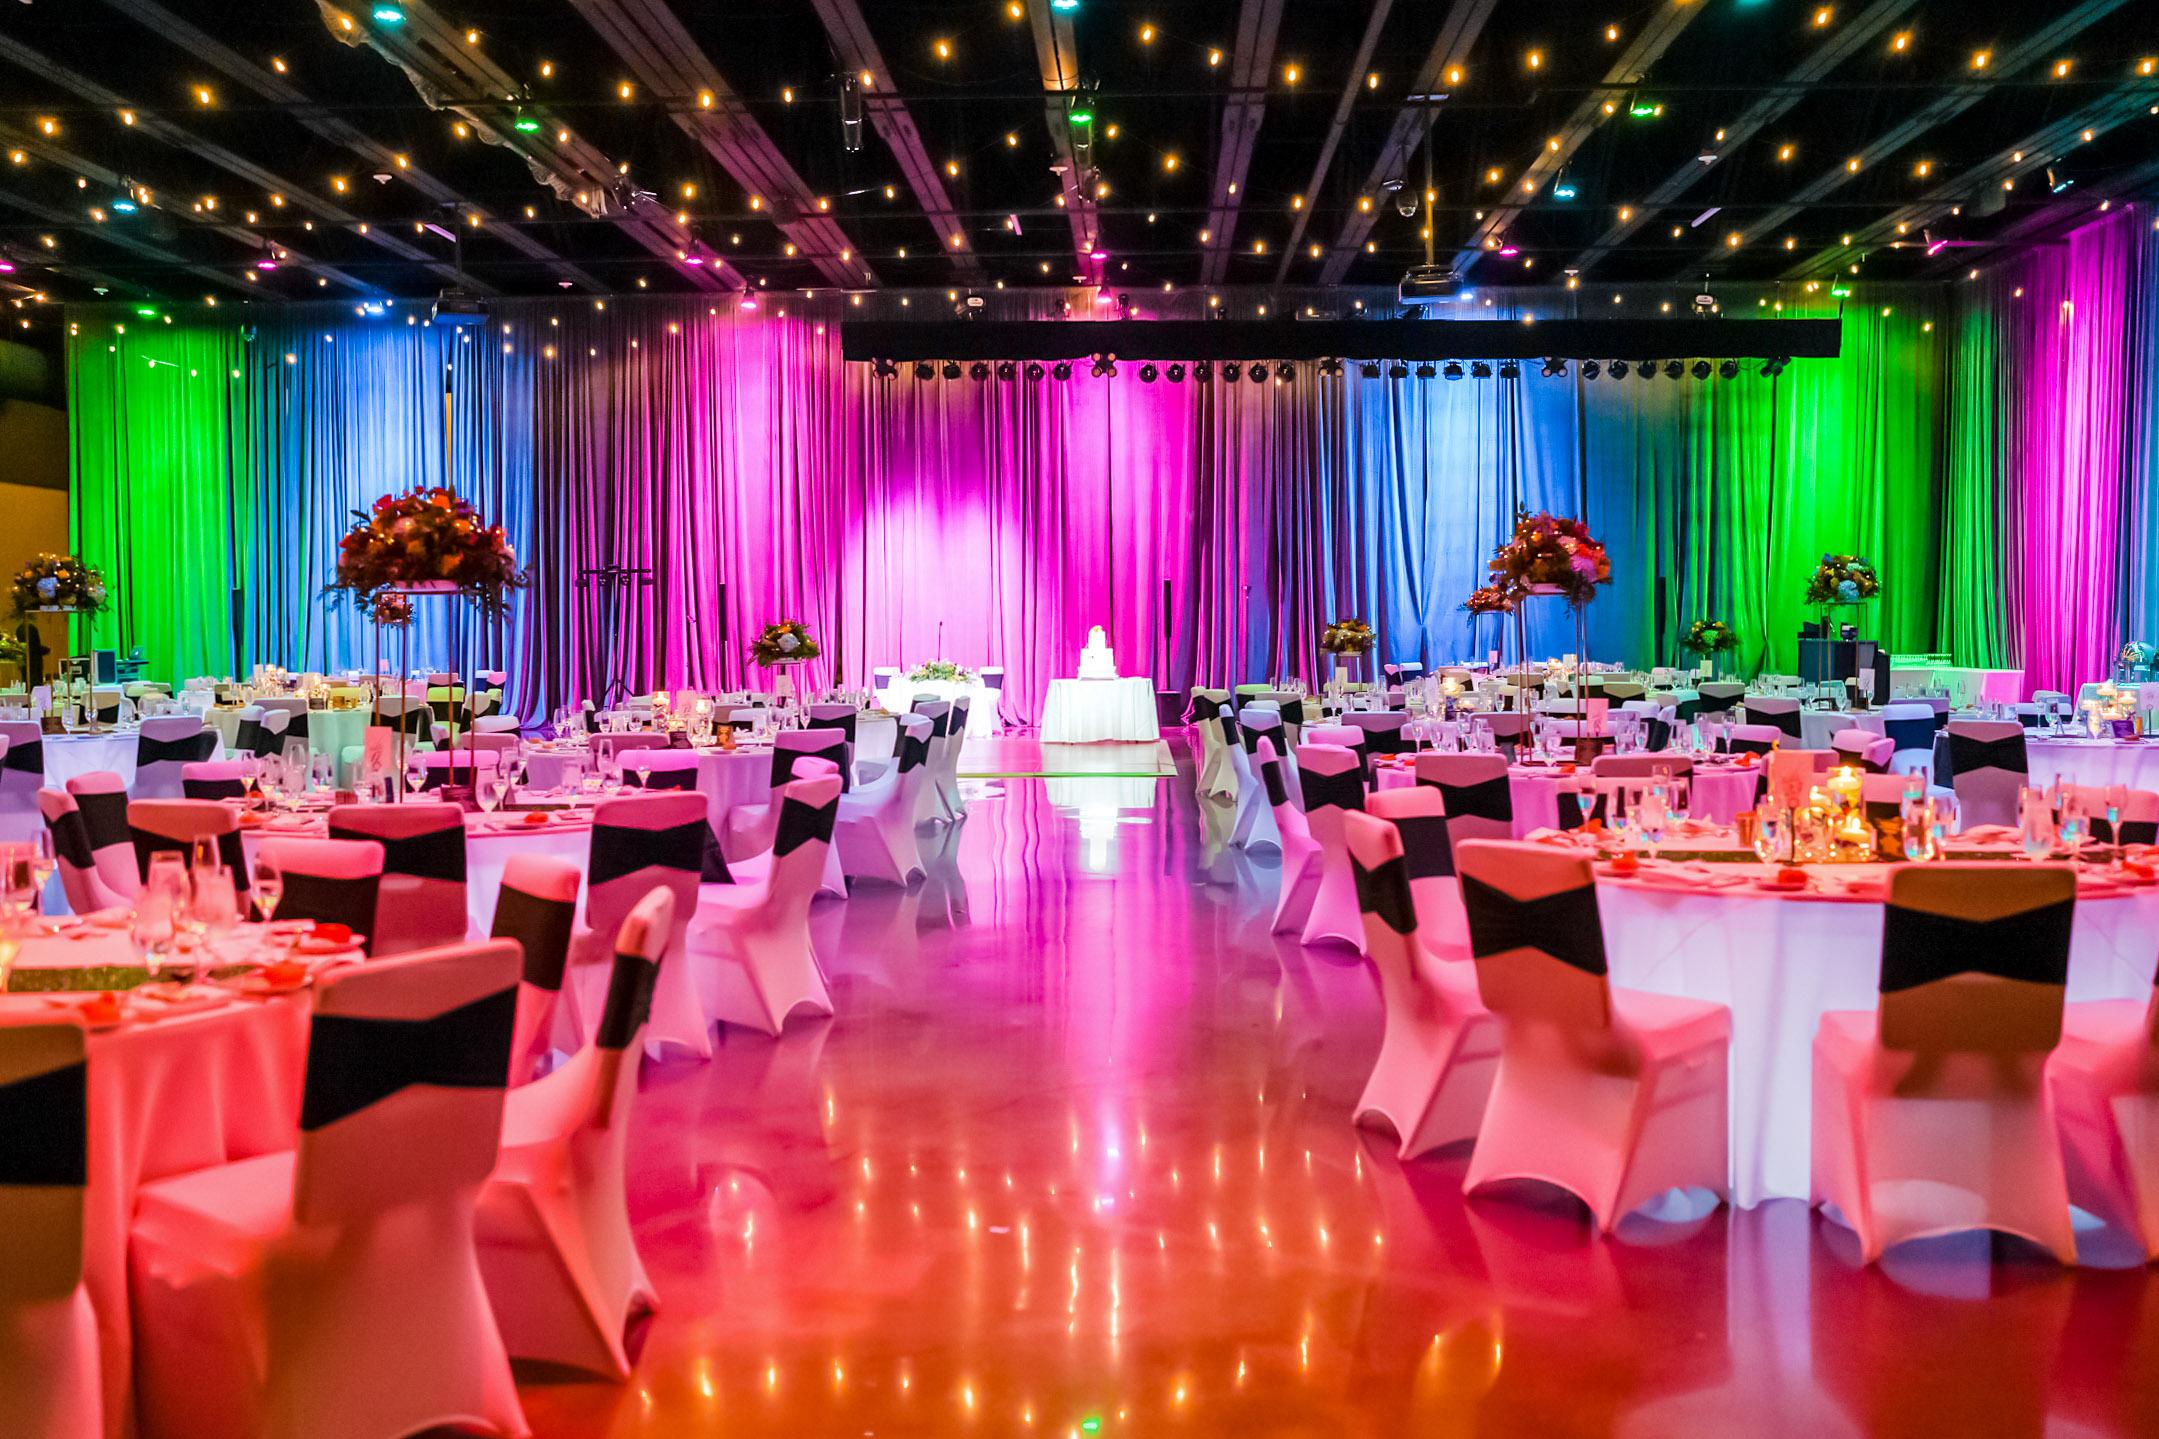
Imagine photographing the bride and groom during a romantic first dance beneath a warm orange glow that mirrors a dreamy sunset. Or creating fun and festive tones with punches of vibrant blue or magenta during a reception party on the dance floor. Gels allow you to paint the scene with color, transporting your audience into the emotion of the moment. Warm colors, such as red or orange, can evoke passion, joy, and intimacy, while cool tones like blue or purple can bring elegance, serenity, or an otherworldly vibe. These hues help amplify small moments, from tender first looks to jubilant family celebrations.
2. Transforming Day-to-Night Settings
Wedding receptions often run late into the evening, creating the challenge of balancing outdoor and indoor lighting. Correction gels, such as CTO (color temperature orange) and CTB (color temperature blue), help blend cool daylight with the warm tungsten light photography of indoor settings. For example, a subtle touch of orange gel can match your flash output to interior lights, keeping the scene cohesive and natural.
3. Adding Depth to Backgrounds
Receivers of wedding albums love seeing shots where backgrounds complement subjects without competing for attention. Using gels to paint otherwise unremarkable walls or ceilings in muted greens, blues, or purples can transform even the dullest conference hall corner into a magical backdrop. This technique works especially well in reception venues with minimal wedding décor.
4. Tailoring to Thematic Vibes
Weddings often follow particular themes, like rustic chic, bohemian, modern glam, or even bold color-coordinated aesthetics. By using color-effect gels strategically, you can enhance each couple’s unique stylistic vision. For example, muted pastels might align beautifully with spring wedding photography, while saturated jewel tones reign in winter nuptials.
Fundamental Rules for Working With Color Gels
Mastering how to use gels effectively requires some understanding of photography fundamentals and plenty of experimentation. Here are some rules to guide you:
1. Light Power and Gel Saturation
Gels reduce the power of your light source. Some gels absorb more light than others (e.g., dark blue might reduce four stops, while light orange could lower only half a stop). Begin with lower light power to see how it interacts with the gel’s transparency. Adjust this balance until you achieve the desired saturation.
2. Avoid Overpowering Skin Tones
When incorporating strong color gels, ensure the lighting doesn’t compromise the natural skin tones of your subjects. For this reason, use gels selectively on rim lights, background photo lights, or even hairlights, while keeping your main key light neutral. The skin should remain recognizable and natural unless you’re intentionally going for an artistic override.
3. Positioning for Intentional Effects
Close placement of gelled lights intensifies their saturation, while greater distance softens the color. For wedding couple portrait lighting, place colored lights strategically, such as behind the couple for glowing silhouette photography or beside them to balance contrasting light directions. Use barn doors or grids for directional control.
4. Complement, Don’t Clash
Color selection is essential. Reference the photography color wheel to find complementary hues that look polished rather than jarring. For wedding photography, opt for colors that harmonize with the event’s palette, this ensures your outcome aligns with the couple’s aesthetic vision.
5. Subtract Rather Than Overwhelm
Subtlety is your friend with gels. While saturated colors have their place in artistic endeavors, wedding photography colors often require a more delicate touch. Incorporate hints of color where appropriate without overloading a frame. For example, a soft magenta background gradient subtly emphasizes romance without stealing focus.
Advanced Applications and Creative Techniques
“Glow from Within” Backlighting
Photography backlight ideas couple with warm yellow or amber gels during sunset portraits to simulate the sun’s soft glow, even after it fades below the horizon. Adjust power to avoid hot spots.
Color Blending with Multiple Lights
Use two or more lights with complementary gels to blend colors across the frame. For example, an orange light on one side and a purple or teal one opposite can create dynamic, artistic separation between the subjects and the background. This effect works wonderfully for vibrant dance floor shots.
On-Lens Obstructions for Drama
For a striking anamorphic effect, use gels in front of the lens to blur edges with colored light obstructions. This technique adds mystique to intimate moments, such as an intimate close-up shot shared between the couple under a chandelier’s sparkle.
Gradient Backgrounds
For editorial-style wedding portraits, pair brightly gelled lights with softboxes and umbrellas to create smooth gradients in the background. This technique works well for fashion-forward shoot settings, such as bridal magazine features.
Storytelling Effects
You can customize the gel use to highlight emotions. Warm tones (e.g., orange, gold) for love and laughter; cool hues (e.g., blue, purple) for reflective or ethereal moments. Dramatic red can signify powerful passion or robust joy.
10 Tips for Using Color Gels in Wedding Photography:
1. Choose the Right Gels
Selecting the correct color gels is critical for creating the desired mood in wedding photography. Creative gels, like vibrant blues, warm oranges, or romantic magentas, can enhance your artistic direction and align with the event’s tones. For corrective purposes, use CTO or CTB gels to balance mixed lighting. Invest in durable gels, such as Rosco or MagMod kits, which are heat-resistant and reliable. Ensure you have a variety to match different settings and lighting conditions at weddings.
2. Secure Gels Properly
Properly attaching gels prevents unwanted light leaks that wash out colors. Use gaffer’s tape to secure gels directly to strobes or flashes. For larger lights like softboxes, affix the gel to the inner modifier or frame. Keep the gel taut to avoid creases that could disrupt light diffusion. When using high-power lights, create a cone shape with the gel to keep it from direct contact and avoid melting, particularly in continuous-light setups.
3. Adjust Light Power
The intensity of your light directly influences the saturation of the gel’s color. For vibrant and bold hues, reduce the power output of the light. For softer and subtler tones, increase the power. Remember that darker gels absorb more light, requiring an increase in strobe power to maintain proper exposure. Experiment with lighting values to strike a balance between saturation and brightness for each segment of the wedding day.
4. Highlight Shadows
Gelled light appears most prominently within the shadows of an image. Use a primary non-gelled light as your key to illuminate the couple, ensuring parts of the scene remain in shadow for creative gel accents. Aim your gelled light, like a blue or magenta rim light, at those shadowed areas to produce radiant color contrasts. Be mindful of the angles and reflection sources to avoid uncontrollable color spills.
5. Experiment with Color Combinations
Pairing harmonious hues elevates your compositions. Complementary photo color combinations, such as orange and teal or red and cyan, create dynamic contrasts, while analogous colors like lavender and pink evoke softer tones. Use multiple gels layered together to create unique blends, perfect for matching wedding themes. Tools like Adobe Color can assist in finding interesting palettes. Experimentation here is key, as color theory can bring artistic stories to life within your photo composition rules.
6. Use Gels on Different Lights
Explore different uses of gels across your wedding photo lighting setup. Background lights can be gelled for gradient effects, while rim lights can add sculpted separation between subjects and the environment. Gelling the main light, typically with softer tones like peach or pink, creates a romantic atmosphere without overtaking the skin tones. Strategically balance the use of gel effects across all layers to enrich the storytelling in your images.
7. Avoid Color Contamination
Whenever multiple gelled lights are employed in close proximity, there is a risk of colors mixing unintentionally, producing undesired results. Use grids, barn doors, or snoots to isolate specific areas affected by each color. Carefully direct each light source so their beams do not intersect unless intentional. Isolating your lighting zones helps maintain clarity and ensures each gel’s role is defined without muddying another light source.
8. Enhance in Post-Production
Don’t worry if you don’t achieve the exact saturation or hue you envisioned straight out of the camera. Post-production tools like Lightroom or Capture One can help fine-tune color intensity and adjustments. If your original photo captures the underlying gel effect, adjustments in highlights, vibrance, and HSL (hue, saturation, luminance) sliders can expand its creative potential. Subtle refinements can amplify drama while keeping the images wedding-appropriate.
9. Test and Adjust
Before the wedding begins, test your gel setups in the venue under ambient lighting conditions. Test gels with various light positions, intensities, and modifiers to ensure consistent performance across changing scenes. This preparation also ensures you avoid surprises like uneven gel spread or overpowering tones. During the event, assess results on-camera and make micro-adjustments to lighting angles, power, or gels to align with real-time dynamics.
10. Embrace Creativity
Color gel photography thrives on inventive approaches. Push boundaries by using gels for dramatic silhouette portraits, layered gradients, or ethereal glows. Experiment with lens obstructions, wrapping gels around the lens for dreamy light leaks on intimate portraits. Encourage thematic boldness, applying festival-like pops of color on dance floors or elegant washes for ceremony backdrops. Trust your vision and adapt it to each couple for deeply individualized wedding stories.
For wedding photographers, color gels are a game-changer. They allow you to manipulate light creatively, emphasize emotion, and produce one-of-a-kind photos. Mastery, however, comes with blending technical skill with imaginative execution. Don’t be afraid to experiment, when done thoughtfully, gels help capture the fleeting beauty of a wedding day with unparalleled artistry. Always keep your couple’s unique personality and style in mind. These moments are theirs, after all. Through effective use of color gels, you’re not just documenting their day; you’re painting their story with light, one frame at a time.