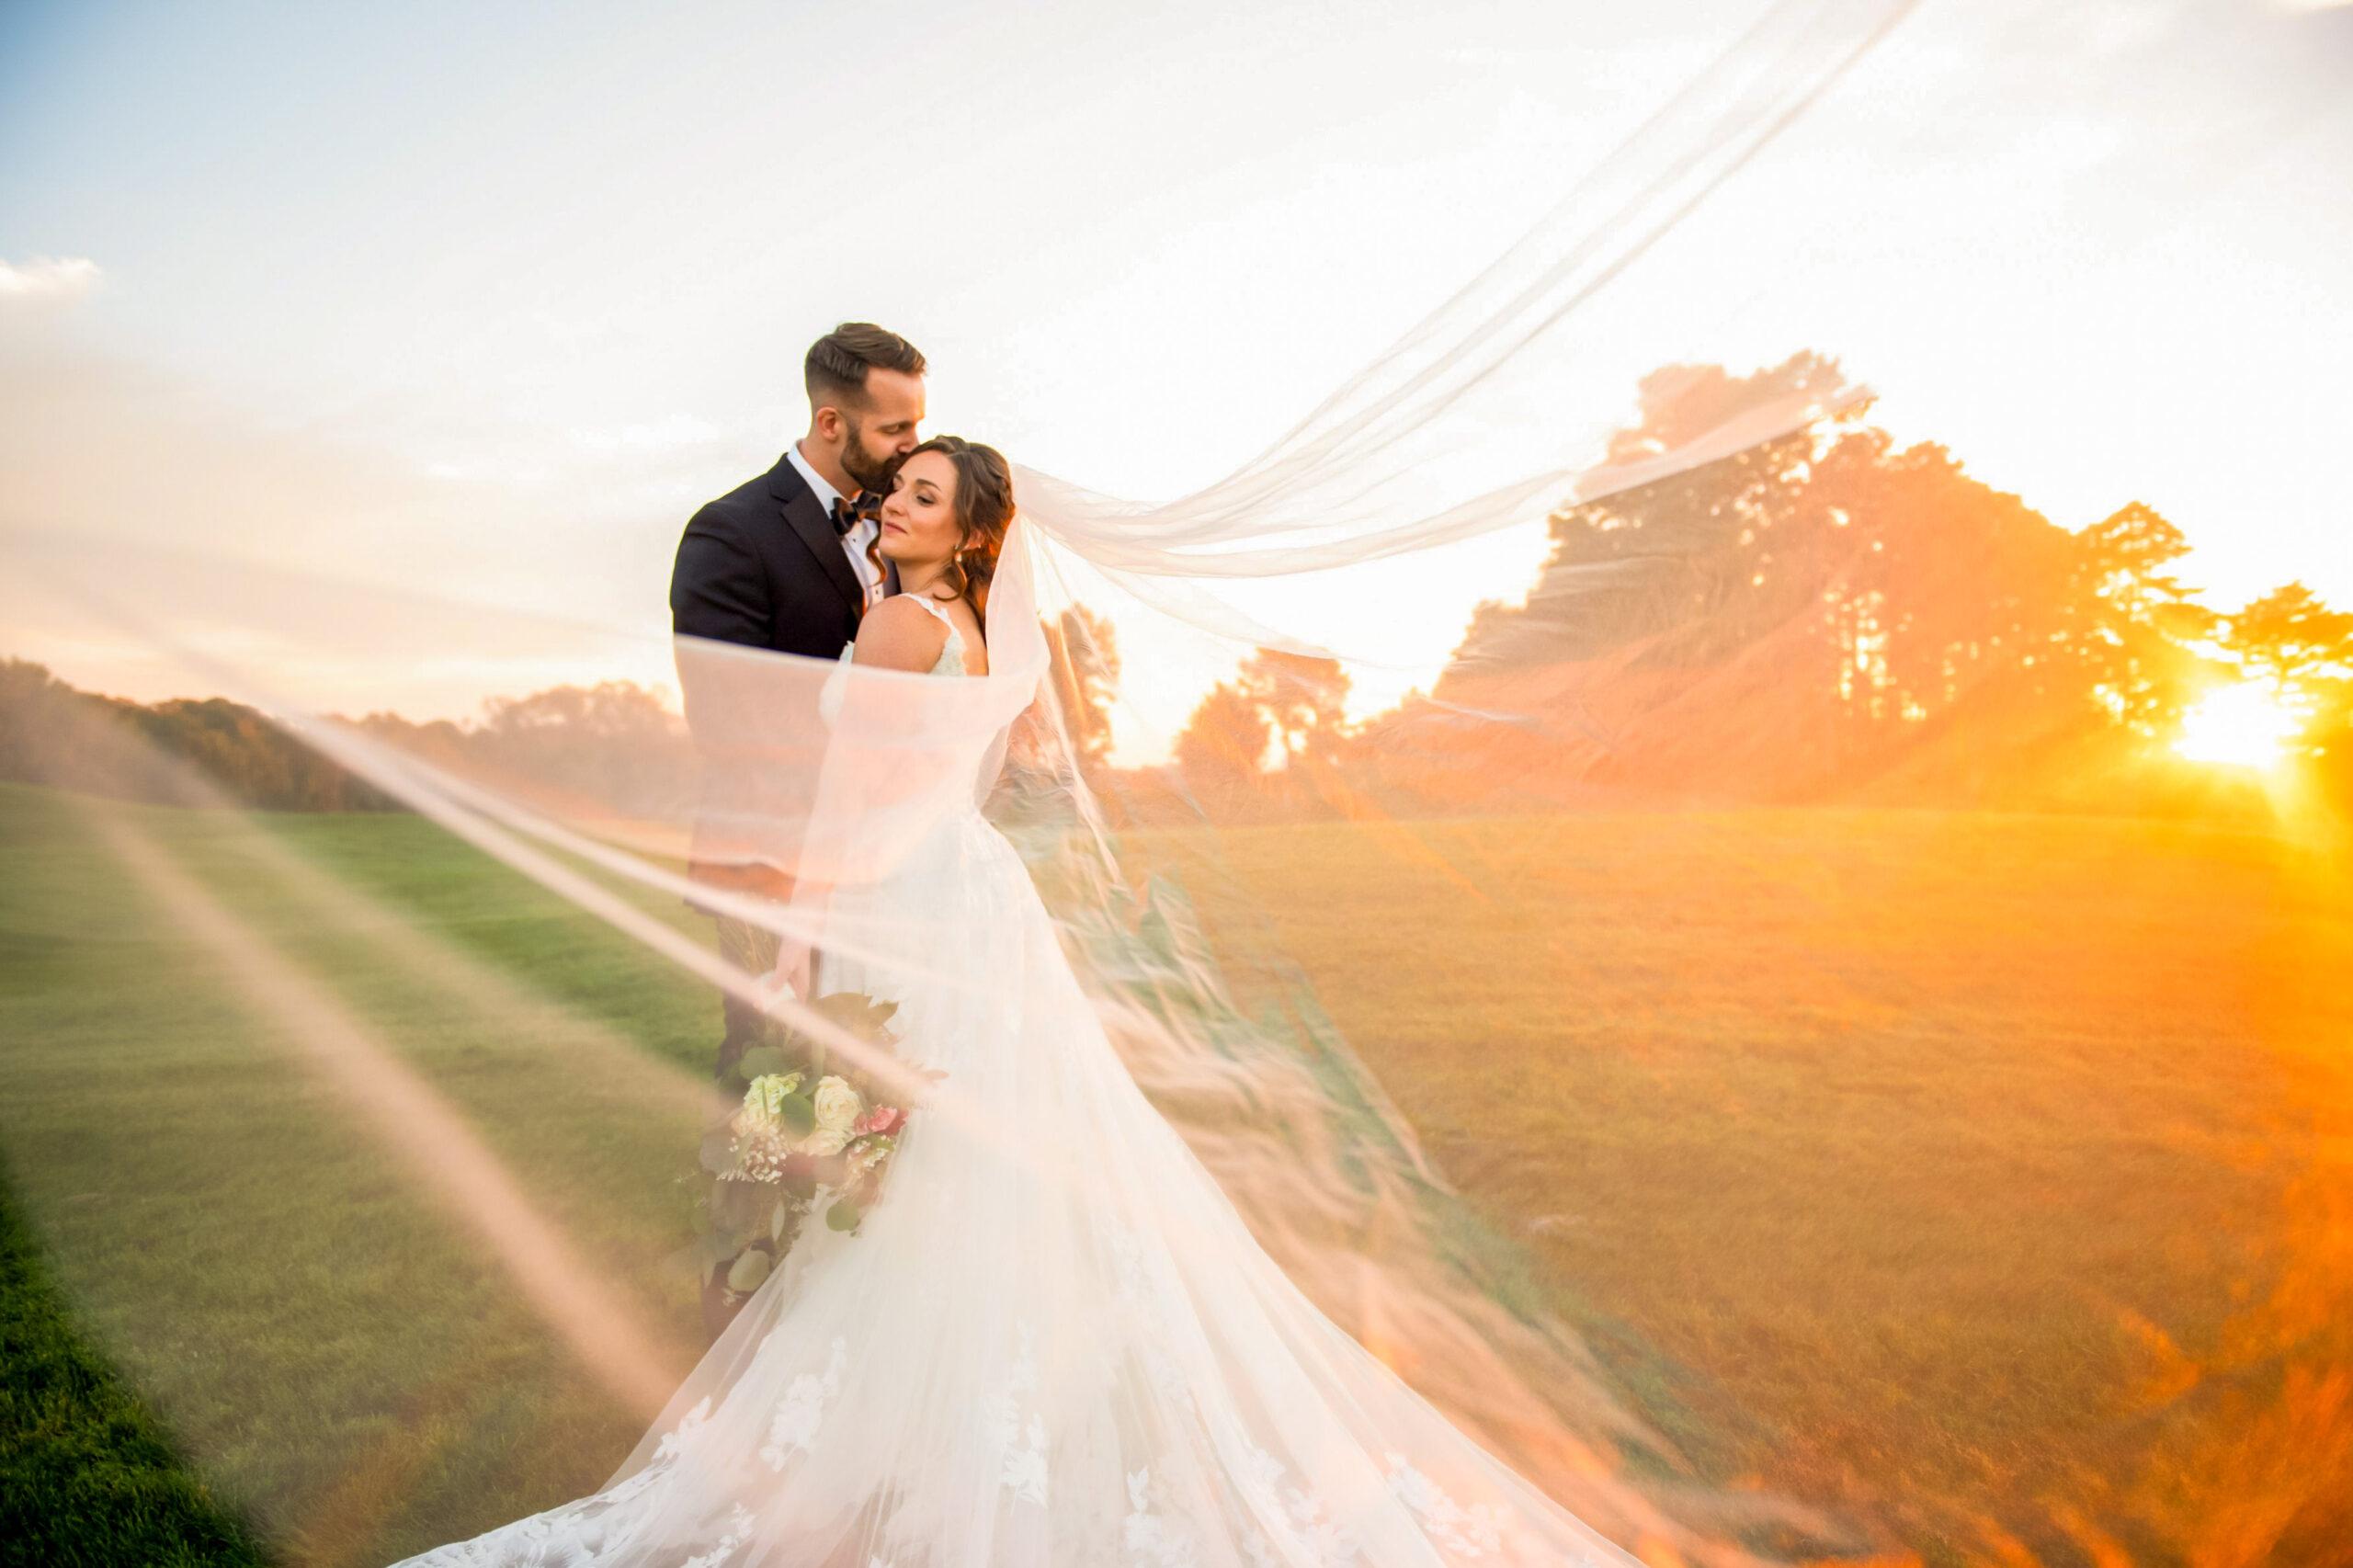
Golden hour photography is a cornerstone of wedding photography, offering a unique opportunity to elevate the visual storytelling of a couple’s special day. As a seasoned wedding photographer, you know that the golden hour, the hour just after sunrise or before sunset, bathes everything in soft, warm light, creating a romantic and ethereal atmosphere. This natural lighting not only flatters skin tones but also adds depth, dimension, and a touch of magic to your images, making them stand out in the couple’s wedding album.
Incorporating golden hour portraits into your timeline can significantly enhance the overall aesthetic of the wedding gallery. The interplay of light and shadow during this time creates a cinematic wedding photography quality that is difficult to replicate with artificial lighting. Whether it is a tender embrace, a playful moment, or a dramatic silhouette, golden hour couple photography allows you to capture the couple’s emotions in a way that feels both intimate and timeless.
In this blog, we are diving deep into the art of golden hour photography with 26 actionable tips to help you make the most of this magical time. From technical settings and creative compositions to effective communication with your clients, these tips are designed to refine your approach and ensure you consistently deliver breathtaking golden hour portraits. Let us explore how to harness the power of golden hour to create unforgettable images that your clients will treasure forever.
Plan the Timing with Precision
Golden hour is fleeting, so precise planning is essential. Use apps like Sun Seeker or PhotoPills to determine the exact timing of sunrise or sunset at the wedding venue. Communicate with the couple and planner to schedule this session in advance. Arrive early to set up and scout the best angles. This preparation ensures you maximize the soft, warm light that defines golden hour photography, creating stunning natural couple portraits with a glow.
Scout the Venue for Ideal Locations
Before the wedding day, visit the venue to identify locations that will look best during golden hour. Look for open spaces, natural backdrops, or areas with interesting architectural elements. Pay attention to how the light interacts with the surroundings. Scouting photo locations in advance allows you to plan compositions that highlight the couple while incorporating the venue’s unique features, resulting in golden hour wedding photos that are both creative and location-specific.
Use Backlighting for a Dreamy Effect
Backlighting is a hallmark of golden hour photography. Position the couple with the sun behind them to create a soft, glowing halo effect. Use a lens hood to minimize lens flare or embrace it for a whimsical touch. Adjust your exposure to balance the light on the couple’s faces while preserving the warm tones of the background. This technique adds depth and romance to your golden hour couple portraits.
Incorporate Silhouettes for Drama
Golden hour is perfect for creating dramatic silhouette shots. Position the couple against the brightest part of the sky and expose for the background. This technique highlights their outlines while showcasing the vibrant colors of the sunset. Silhouette photography adds variety to the wedding gallery and creates a striking visual impact, making it a must-have for golden hour wedding photography.
Use Reflectors for Balanced Lighting
While golden hour light is soft, it can still create shadows on the couple’s faces. Use a reflector to bounce light back onto them, ensuring even illumination. A gold reflector enhances the warm tones of the natural light, complementing the golden hour aesthetic. This simple tool helps you achieve professional-quality lighting without the need for additional equipment, making it an essential part of your golden hour photography kit.
Experiment with Lens Choices
Golden hour is the perfect time to experiment with different lenses. Use a wide-angle lens to capture the couple within the context of the venue’s landscape, or switch to a prime lens with a wide aperture for dreamy, shallow depth-of-field portraits. A telephoto lens can compress the background, making the couple stand out against the warm, glowing light. Varying your lens choices adds diversity to your golden hour wedding photos.
Shoot in Manual Mode for Full Control
Golden hour lighting changes quickly, so shooting in manual mode gives you full control over your settings. Start with a wide aperture (f/2.8 or lower) to let in more light, a low ISO to reduce noise, and a shutter speed fast enough to avoid motion blur. Adjust your settings as the light fades to maintain proper exposure. Mastering manual mode ensures you capture the best golden hour couple portraits.
Incorporate Movement for Natural Poses
Golden hour is ideal for capturing movement, which adds a sense of authenticity to your photos. Encourage the couple to walk hand-in-hand, twirl, or share a playful moment. The soft, directional light enhances the natural flow of these actions, creating dynamic and emotive images. Movement-based poses also help the couple feel more relaxed, resulting in candid golden hour wedding photos that truly reflect their personalities.
Leverage the Sky’s Changing Colors
As golden hour transitions into twilight, the sky’s colors shift from warm oranges to soft purples and blues. Use this natural progression to add variety to your golden hour portraits. Adjust your white balance to emphasize the changing tones and experiment with compositions that highlight the sky. Capturing these transitions adds depth to the wedding gallery and showcases the full beauty of golden hour photography.
Shoot in RAW for Post-Processing Flexibility
Golden hour lighting is beautiful but can be tricky to manage, especially with rapidly changing conditions. Shooting in RAW format gives you maximum flexibility in post-processing. You can recover highlights, adjust shadows, and fine-tune the white balance to enhance the warm tones of the golden hour. RAW files ensure you can bring out the best in your golden hour wedding photos, delivering a polished final gallery to your clients.
Position the Couple at an Angle to the Sun
Instead of placing the couple directly in front of or behind the sun, position them at an angle to create soft side lighting. This technique adds depth and dimension to their faces while maintaining the warm glow of golden hour. Side lighting also enhances textures, such as the bride’s dress or the groom’s suit, making the details pop in your golden hour wedding portraits.
Use Natural Frames for Creative Compositions
Golden hour light works beautifully with natural frames like tree branches, arches, or windows. Position the couple within these elements to draw attention to them while adding visual interest to the composition. The soft, directional light of golden hour enhances these frames, creating a balanced and artistic look that elevates your wedding photography portfolio.
Capture Reflections for Unique Perspectives
Look for reflective surfaces like water, glass, or even a shiny table to incorporate into your golden hour shots. Reflections add a creative twist to your compositions, doubling the impact of the warm, glowing light. Position the couple near the reflective surface and adjust your angle to capture both their image and the surrounding golden hues for a striking effect.
Play with Shadows for Artistic Shots
Golden hour’s low-angle light creates long, dramatic shadows that can be used creatively. Position the couple so their shadows stretch across the frame, or focus on the interplay of light and shadow on their faces or surroundings. These artistic touches add variety to your golden hour wedding photos and showcase your creative vision.
Use Off-Camera Flash for Balanced Exposure
While natural light is the star of golden hour, an off-camera flash can help balance exposure when the light is fading. Use a low-power setting to subtly illuminate the couple without overpowering the warm tones of the background. This technique ensures the couple remains the focal point while preserving the natural beauty of golden hour lighting.
Incorporate Foreground Elements for Depth
Add depth to your golden hour portraits by including foreground elements like flowers, foliage, or architectural details. Position these elements slightly out of focus to frame the couple and create a sense of dimension. The soft, warm light of golden hour enhances these layers, resulting in visually rich and dynamic compositions.
Experiment with Lens Flare for a Whimsical Look
Golden hour is the perfect time to embrace lens flare for a whimsical, dreamy effect. Position the sun just outside the frame or partially obscured by an object to create subtle flares. Use a wide aperture to enhance the effect, but be mindful of overexposure. Lens flare adds a touch of magic to your golden hour wedding photos, making them feel ethereal and romantic.
Capture Close-Ups for Emotional Impact
Golden hour light is incredibly flattering for close-up shots, highlighting the couple’s expressions and emotions. Use a prime lens with a wide aperture to focus on their faces while softly blurring the background. The warm, directional light enhances skin tones and adds a natural glow, making these intimate portraits a standout feature in the wedding gallery.
Use Leading Lines to Guide the Eye
Incorporate leading lines, such as pathways, fences, or natural elements, to guide the viewer’s eye toward the couple. Golden hour light accentuates these lines, adding depth and focus to your composition. Position the couple at the vanishing point of the lines to create a visually compelling image that draws attention to them.
Capture Interaction with the Environment
Encourage the couple to interact with their surroundings during golden hour. Whether it is walking through a field, sitting on a rustic bench, or leaning against a tree, these natural interactions create authentic storytelling moments. The soft, warm light enhances the connection between the couple and their environment, resulting in sunset wedding photos that feel organic and timeless.
Incorporate Motion Blur for Artistic Flair
Golden hour is an excellent time to experiment with motion blur for creative effects. Use a slower shutter speed to capture the couple walking, spinning, or dancing while keeping the background sharp. The warm, directional light adds a dreamy quality to the blurred motion, creating artistic golden hour wedding photos that stand out in the gallery.
Focus on the Details in Golden Light
Golden hour is not just for wide shots and portraits; it is also perfect for capturing details like the bride’s bouquet, wedding rings, or intricate dress patterns. Use a macro lens to highlight these elements against the soft, glowing light. These detail shots add variety to the wedding album and showcase the beauty of the couple’s carefully chosen accessories.
Use Negative Space for Minimalist Compositions
Golden hour light works beautifully with minimalist compositions that emphasize negative space. Position the couple in a corner of the frame and let the warm, glowing sky or a simple landscape fill the rest. This technique creates a clean, modern aesthetic while drawing attention to the couple as the focal point of the image.
Capture Interaction with Each Other
Golden hour is the perfect time to capture the couple’s natural chemistry. Encourage them to share a laugh, hold hands, or steal a kiss. The soft, flattering light enhances these intimate moments, creating golden hour portraits that feel genuine and heartfelt. These candid interactions often become the couple’s favorite images.
Experiment with High-Key Lighting
Golden hour offers an opportunity to experiment with high-key lighting for a bright, airy look. Position the couple in front of the sun and overexpose slightly to create a soft, glowing effect. This technique works particularly well for romantic, whimsical portraits and adds a unique style to your golden hour wedding photography.
Capture the Transition to Blue Hour
As golden hour fades into blue hour, take advantage of the cooler tones to add variety to your gallery. Use the remaining ambient light to capture moody, cinematic portraits. Adjust your white balance to emphasize the shift in tones, and incorporate artificial lighting if needed. This transition creates a seamless flow in the wedding album, showcasing the full range of natural light throughout the day.
Golden hour photography is a transformative element in wedding photography, offering unparalleled opportunities to create stunning, emotive images. By mastering these 26 tips, you can harness the soft, warm light to craft portraits that are both technically flawless and artistically captivating. From precise planning and creative compositions to leveraging natural and artificial light, these strategies ensure you capture the magic of golden hour in every frame. Elevate your wedding galleries with timeless, breathtaking images that your clients will cherish forever.