As a seasoned wedding photographer, you understand that each wedding album is a tapestry of moments, woven together to tell a couple’s unique love story. Among the myriad of elements you capture, the night sky offers a breathtaking backdrop that can transform ordinary wedding portraits into extraordinary works of art. Highlighting the night sky in your compositions does more than just fill the frame with celestial beauty; it evokes a sense of wonder and romance, encapsulating the infinite possibilities of love.
Incorporating night sky photography allows you to harness the natural beauty of the stars, the moon, and the vast expanse above. This celestial canvas can add depth and drama to your images, creating a magical ambiance that resonates with the couple’s dreams and aspirations. A well-captured night sky can provide a stunning contrast to the warm glow of candlelit or string-lit ceremonies as well as wedding send-off portraits amidst sparklers or fireworks, enriching the tonal palette of your album and offering viewers a breathtaking view that connects them to the universe beyond.
Moreover, photographing the night sky requires a mastery of skills and techniques that can elevate your portfolio, showcasing your ability to adapt and thrive in challenging lighting conditions. It demands an artistic vision and technical prowess to balance exposure, composition, and timing, transforming your night wedding portraits into a symphony of light and shadow.
Understanding the significance of this artistic endeavor, as we approach the Fourth of July, we invite you to explore our comprehensive guide featuring 27 expert tips for capturing night sky wedding photography. Embrace the night sky as your canvas, and let our nighttime photography tips tell stories of love that are as endless as the stars themselves.
Escape Light Pollution
To capture a pristine night sky, distance yourself from local and global light pollution. Move away from urban areas and use tools like Dark Site Finder to locate darker skies. This minimizes interference from artificial lights, making celestial features more prominent in your photos. By positioning yourself in these optimal locations, you enhance the chances of capturing the stars’ natural beauty, ensuring your night portraits have a truly breathtaking backdrop.
Maximize Aperture and ISO
Utilize a wide aperture (low f-stop) to let in more light, coupled with a high ISO setting to increase sensor sensitivity. This combination allows for better exposure in low-light conditions. However, be mindful of noise at higher ISOs; post-processing may be required to reduce grain. This technique will enable you to capture detailed and vibrant night skies, adding depth and drama to your night wedding photography.
Focus with Live View
Achieve tack-sharp focus on stars by using your camera’s live view. Zoom in on a bright star and manually adjust the focus ring until the star appears crisp. This method ensures precise focus, critical for long-exposure astrophotography. By mastering this technique, you can guarantee that both the stars and your subjects remain clear and well-defined, enhancing the overall quality of your nighttime portraits.
Utilize a Sturdy Tripod
Stability is key for long exposure shots. A sturdy tripod prevents camera shake, maintaining sharpness during extended shutter speeds. This is crucial when capturing star trails or the Milky Way, where even minor movements can blur the image. By investing in a reliable tripod, you ensure that your night sky images remain crisp and professional, providing a solid foundation for creative compositions.
Compose with Foreground Elements
Incorporate interesting foreground elements to create a dynamic photo composition. Position the couple against the night sky, using natural or architectural features to frame the shot. This adds depth and context, transforming a simple starry background into a compelling story. By thoughtfully composing your images, you can elevate the visual impact of your wedding portraits, making them memorable and unique.
Embrace Long Exposures
Experiment with long exposures to capture the movement of stars across the sky. Use the “500 rule” to calculate the maximum exposure time without star trails, based on your lens’ focal length. This technique allows you to capture the serene beauty of the night sky while providing a stunning, ethereal backdrop for your subjects.
Play with Light Painting
Introduce light painting to illuminate your subjects or foreground subtly. Use a flashlight or LED source to add creative highlights during long exposures. This light painting technique allows for artistic expression, adding a unique touch to your night portraits. By experimenting with light painting, you can create magical scenes that blend celestial and terrestrial elements seamlessly.
Monitor Moon Phases
Plan your night shoots around the moon’s phases for optimal star visibility. A new moon offers darker skies, while a crescent can add a soft glow to your compositions. Understanding the moon’s position and light can greatly influence the mood and clarity of your night portraits.
Experiment with White Balance
Adjust white balance settings to enhance the colors of the night sky. Use tungsten or Kelvin settings to capture true celestial hues. Shooting in RAW format allows for greater flexibility in post-processing, enabling you to adjust colors accurately. By mastering white balance adjustments, you can ensure your night sky images are vibrant and visually striking, highlighting the natural beauty of the stars.
Leverage Post-Processing
Utilize software like Lightroom or Photoshop to refine your images. Reduce noise, adjust exposure, and enhance star visibility to bring out the best in your photos. Post-processing is essential for night photography, allowing you to perfect the final image. By skillfully editing your night sky portraits, you can deliver professional-quality photos that captivate and inspire, showcasing the beauty of the universe.
Use a Remote Shutter Release
To minimize camera shake during long exposures, use a remote shutter release. This tool allows you to trigger the camera without physically touching it, ensuring maximum stability. This is particularly useful for capturing intricate details in the night sky, like star trails or the Milky Way. By maintaining a steady camera, you ensure your night portraits remain sharp and clear, allowing the celestial beauty to shine through.
Incorporate Star Trails
Capture star trails by extending your exposure time. Use a lower ISO and a closed aperture to control light intake. The continuous movement of the stars creates stunning circular patterns, adding a dynamic element to your compositions. By integrating star trails into your portraits, you can convey the passage of time and enhance the ethereal quality of the night sky.
Experiment with HDR Photography
High Dynamic Range photography can enhance night sky details. Capture multiple exposures at different settings and blend them using software. This technique allows you to highlight both the foreground and celestial elements without losing detail. HDR can add a rich, textured quality to your night portraits, offering a balanced and visually appealing image that captivates viewers.
Capture Reflections
Utilize water or other reflective surfaces to double the starry effect. Position your subjects near a lake or a reflective element that mirrors the night sky. This creates a surreal, dreamlike quality in your portraits, adding depth and interest.
Adjust to Weather Conditions
Monitor weather forecasts to plan your shoot around clear skies. Cloudy day photography can obstruct the stars, so aim for a night with minimal cloud cover. Be flexible and ready to adapt to changing unexpected weather conditions photography, as unexpected weather can offer unique photographic opportunities. By understanding and anticipating weather patterns, you can optimize your chances of capturing stunning night portraits.
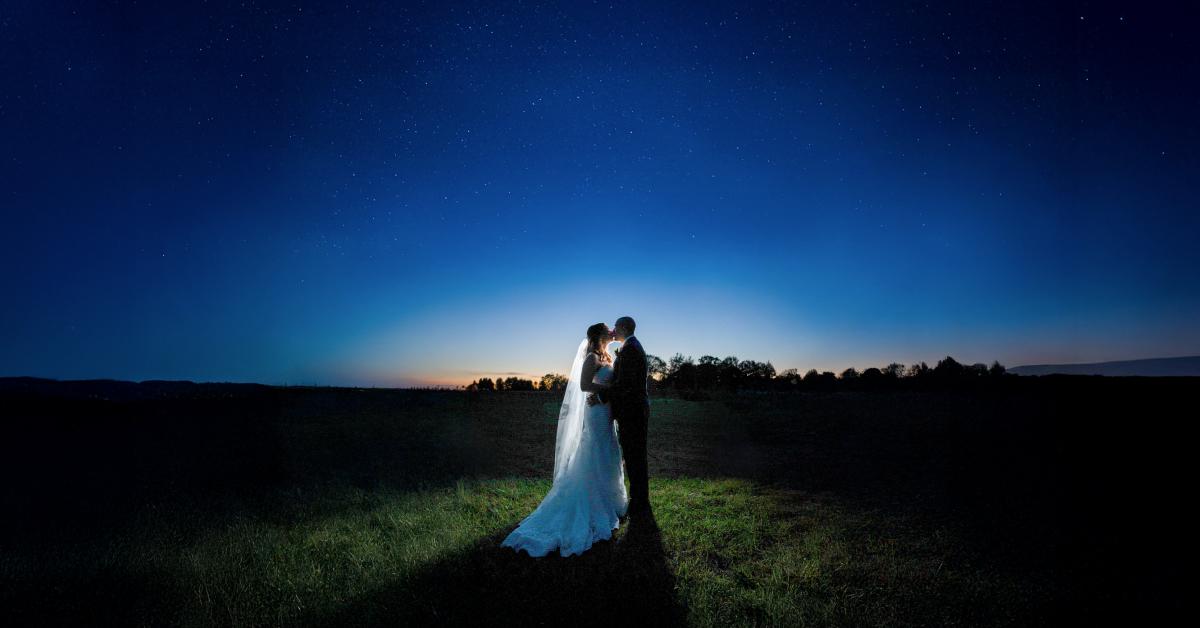
Utilize Silhouettes
Mastering silhouette photography by positioning your subjects against a bright section of the sky. Use a low exposure to highlight the contrast between the dark figures and the illuminated sky. This technique provides a dramatic, artistic effect, emphasizing the grandeur of the night sky while maintaining focus on your subjects. Silhouette portraits can add mystery and intrigue to your wedding portraits.
Capture Movement with Time-Lapse
Create a time-lapse sequence to showcase the movement of the night sky. Set your camera to capture a series of images over a prolonged period, then compile them into a video. This technique reveals the dynamic nature of the stars and adds an animated quality to your work. By incorporating time-lapse, you can offer your clients a unique perspective of their special night.
Use Creative Framing
Framing in photography creatively using natural or man-made elements. This can include archways, branches, or architectural features that draw the eye to the stars. Thoughtful photography framing ideas add layers and structure to your composition, enhancing the visual narrative.
Explore Different Focal Lengths
Experiment with wedding photography lenses to achieve different effects. Wide-angle lenses capture vast expanses of the sky, while telephoto lenses can isolate specific celestial features. Each focal length offers a unique perspective, allowing for creative exploration of the night sky. By experimenting with different lenses, you can diversify your portfolio and offer a range of artistic options to your clients.
Balance Natural and Artificial Light
Skillfully balance natural starlight with artificial sources, like fairy lights or lanterns. Use these lights to softly illuminate your subjects while keeping the stars prominent. This technique creates a harmonious blend of warm and cool tones, adding depth and atmosphere to your images. By balancing light sources, you can enhance the romantic and magical ambiance of your night portraits.
Capture the Galactic Core
Timing your shoot to capture the Milky Way’s galactic core can add a spectacular element to your portraits. This core is most visible during certain months, depending on your location. Use apps to track its position and plan your session accordingly. By incorporating this celestial feature, you add an awe-inspiring backdrop that elevates the narrative and impact of your wedding portraits.
Experiment with Star Filters
Use star filters to enhance the twinkle effect of stars and artificial lights. These filters create a starburst effect, adding a magical quality to your images. By experimenting with these accessories, you can introduce unique, artistic flair to your photos, highlighting the enchanting nature of the night sky and enhancing the overall aesthetic of your portraits.
Avoid Overexposure
Carefully manage your camera settings to avoid overexposing the sky. Use a histogram to ensure your images maintain detail without losing the delicate nuances of the stars. Balancing exposure is crucial to preserving the natural beauty and detail of the night sky, providing a clear and captivating backdrop for your wedding portraits.
Incorporate Motion Blur
Introduce a sense of motion by capturing subtle blur photography ideas in the stars or clouds. Use longer shutter speeds to create a dynamic, fluid effect, adding an ethereal quality to your images. By skillfully applying motion blur, you can convey movement and life, enhancing the story and depth of your night sky portraits.
Capture the Aurora Borealis
If you’re in a suitable location, plan a shoot to include the Northern Lights. This natural phenomenon offers a breathtaking backdrop, adding vibrant colors and a sense of wonder to your portraits. By capturing the aurora, you provide your clients with a once-in-a-lifetime image that beautifully intertwines nature’s spectacle with their special moment.
Use a Star Tracker
Use a star tracker to follow the movement of the stars, allowing for longer exposures without star trails. This tool keeps celestial bodies sharp and in focus, enhancing the clarity and detail of the night sky in your portraits. By using a star tracker, you can achieve stunningly clear images that showcase the intricate beauty of the cosmos.
Include a Panorama
Create a panoramic image to showcase the vastness of the night sky. Capture multiple frames and stitch them together using editing software for a sweeping view. This technique highlights the grandeur and scale of the stars, providing a dramatic and immersive experience. By incorporating panoramas, you can offer your clients a comprehensive view of their starry wedding night.
Incorporating the night sky portraits offers unparalleled beauty and creativity. By mastering technical skills and embracing innovative techniques, photographers can transform starry nights into stunning backdrops. These tips ensure your wedding photography stands out by capturing the romance and wonder under a celestial canopy. The enchanting night sky serves as a breathtaking backdrop, inspiring emotions and creating unforgettable memories that perfectly encapsulate the magic of your special day.